How to Recover Your Data When Your Windows Not Running ?
If you have a computer with a corrupted Windows/Other OS or you having a hard disk which you wants to recover your old important data, then in this tutorial I’m gonna help you out With this problem. You can only need a running computer, your old hard disk and bootable software which I’m going to show you.
This tutorial only works when only your windows got corrupted and you wants to recover your data but if your computer got dead or it doesn’t get starts then go with our given tutorial below according to your problem and we gonna help you out from your dead computer first.
In case your computer got really dead and doesn’t able to get start then you can try to attach your hard disk to another running computer and then try to do this tutorial to recover you data from your corrupted OS hard disk.
Recovering data from old or corrupted windows hard disk is such an easy task to do even a kid can do that. You’ll just have to do the one thing, read the article carefully, repeat the steps what I do and that’s it.
If you have a computer with a corrupted Windows/Other OS or you having a hard disk which you wants to recover your old important data, then in this tutorial I’m gonna help you out With this problem. You can only need a running computer, your old hard disk and bootable software which I’m going to show you.
This tutorial only works when only your windows got corrupted and you wants to recover your data but if your computer got dead or it doesn’t get starts then go with our given tutorial below according to your problem and we gonna help you out from your dead computer first.
In case your computer got really dead and doesn’t able to get start then you can try to attach your hard disk to another running computer and then try to do this tutorial to recover you data from your corrupted OS hard disk.
Recovering data from old or corrupted windows hard disk is such an easy task to do even a kid can do that. You’ll just have to do the one thing, read the article carefully, repeat the steps what I do and that’s it.
So, let’s get start
Step 1 – Download the Live OS
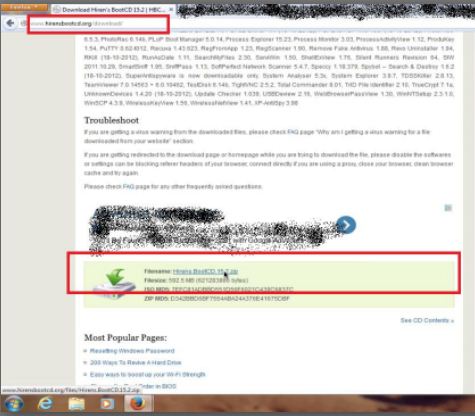
In this step you’re gonna download the live OS from the downloading link given below, scroll down the web page and you will find it.
Hirens.BootCD.15.2.zip Download link >>>>> http://www.hirensbootcd.org/download/
We are using Hirens Boot CD because it’s a bootable software which contains numbers of diagnostic tools and live operating system called Mini Windows XP. Mini windows XP is a plug & play software. It doesn’t need be installed to your hard disk. Just write a bootable disc and you can use it just like a normal Windows XP.
 Step 2 – Extract Zip File & Burn bootable disk
After your download completes you’ve got a Hirens.BootCD.15.2.zip file in your download folder. Extract that file and write a bootable disk or an usb pen drive with the iso file in it. If you don’t know how to make it then we have another tutorial below to show you how to do it.
After you’ve successfully written your Hirens Bootable Cd then it’s time to boot it. To boot the disk or usb you’ll need to set the boot order first according to your boot device. So, set the boot device and insert the disk or usb to boot it.
Step 4 – Boot Your Disc or usb
When you successfully change the boot orders to CD-ROM or USB, then restart your system insert the disc/USB and you will get the menu like this:
Step 2 – Extract Zip File & Burn bootable disk
After your download completes you’ve got a Hirens.BootCD.15.2.zip file in your download folder. Extract that file and write a bootable disk or an usb pen drive with the iso file in it. If you don’t know how to make it then we have another tutorial below to show you how to do it.
After you’ve successfully written your Hirens Bootable Cd then it’s time to boot it. To boot the disk or usb you’ll need to set the boot order first according to your boot device. So, set the boot device and insert the disk or usb to boot it.
Step 4 – Boot Your Disc or usb
When you successfully change the boot orders to CD-ROM or USB, then restart your system insert the disc/USB and you will get the menu like this:
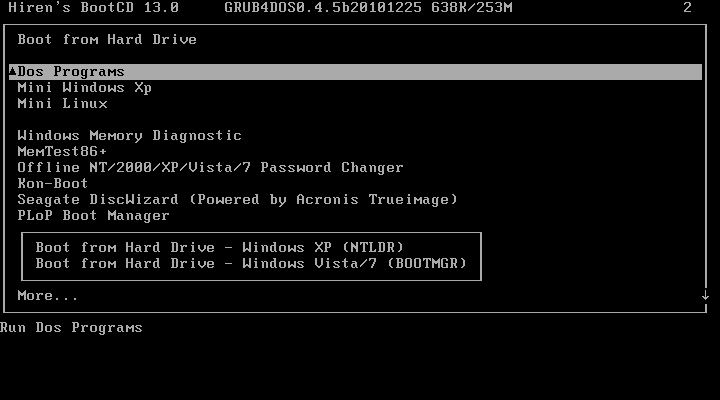 Step 4.1 – Select the Mini Windows XP and Press Enter. Now, your windows get starts to load. When the loading completes you’ll see the windows is open.
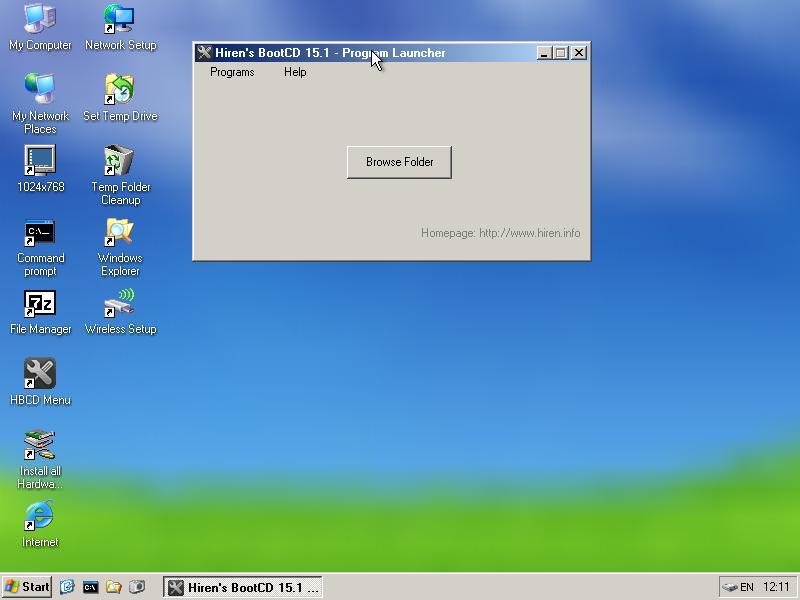 Now your Windows is open completely and you can do whatever you want with it. Connect an external hard drive or another usb drive to take a backup of your data from the hard disk. Open the “My Computer” to get list of your hard drive partitions and copy all the files to your external drive just like your normal computer windows.
Sometimes external hard disk won’t work , in that case attach the hard disk, restart the computer and then boot the mini windows XP again.
Enjoy..........NCTTS
Now your Windows is open completely and you can do whatever you want with it. Connect an external hard drive or another usb drive to take a backup of your data from the hard disk. Open the “My Computer” to get list of your hard drive partitions and copy all the files to your external drive just like your normal computer windows.
Sometimes external hard disk won’t work , in that case attach the hard disk, restart the computer and then boot the mini windows XP again.
Enjoy..........NCTTS
Step 1 – Download the Live OS
In this step you’re gonna download the live OS from the downloading link given below, scroll down the web page and you will find it.
Hirens.BootCD.15.2.zip Download link >>>>> http://www.hirensbootcd.org/download/
We are using Hirens Boot CD because it’s a bootable software which contains numbers of diagnostic tools and live operating system called Mini Windows XP. Mini windows XP is a plug & play software. It doesn’t need be installed to your hard disk. Just write a bootable disc and you can use it just like a normal Windows XP.
Step 2 – Extract Zip File & Burn bootable disk
After your download completes you’ve got a Hirens.BootCD.15.2.zip file in your download folder. Extract that file and write a bootable disk or an usb pen drive with the iso file in it. If you don’t know how to make it then we have another tutorial below to show you how to do it.
After you’ve successfully written your Hirens Bootable Cd then it’s time to boot it. To boot the disk or usb you’ll need to set the boot order first according to your boot device. So, set the boot device and insert the disk or usb to boot it.
Step 4 – Boot Your Disc or usb
When you successfully change the boot orders to CD-ROM or USB, then restart your system insert the disc/USB and you will get the menu like this:
Step 4.1 – Select the Mini Windows XP and Press Enter. Now, your windows get starts to load. When the loading completes you’ll see the windows is open.
Now your Windows is open completely and you can do whatever you want with it. Connect an external hard drive or another usb drive to take a backup of your data from the hard disk. Open the “My Computer” to get list of your hard drive partitions and copy all the files to your external drive just like your normal computer windows.
Sometimes external hard disk won’t work , in that case attach the hard disk, restart the computer and then boot the mini windows XP again.
Enjoy..........NCTTS


