How to clear or reset your Desktop Computer BIOS or CMOS Password ?

How to clear or reset your Desktop Computer BIOS or CMOS Password ?

We use bios password to add up some extra security in our desktop and laptop and they prevent other users to changing the setting or it can also prevent system booting without any permission. Just like all our passwords we forgot one of them or sometimes it can be the bios password. In that case most people sending the computer to the IT department or sent back to the manufacture to reset the bios, I know it can be expensive because it will not covered in the computer’s warranty. So, don’t worry about that in this tutorial we show you “How to clear or break your Desktop computer BIOS or CMOS password?” by some backdoor tricks or passwords.
This tutorial is intended for experience computer hardware engineer, if you are a home user don’t try to do it by alone get some help of an engineer otherwise contact us and we demonstrate you how to do it. Deskdecode.com is not responsible for the any kind of use or misuse of this material, including loss of data, damage to hardware, or personal injury. Before attempting this tutorial, please take some time and call your laptop customer care support and ask the recommended methods of resetting the bios password, if they will not help’s you then read this tutorial and try to do it by your own.

So let’s get started

You can reset the bios password by different backdoor tricks. Here’s a list of backdoor tricks:
  1. Reset by backdoor passwords
  2. Reset by software
  3. Reset by bios jumper
  4. Reset by C-MOS battery

Reset by backdoor password –

There are some of backdoor passwords which the bios manufacture company creates to open the bios menu in case of customer forgets our own password. Here are some passwords according by Bios Company
  1. Award BIOS backdoor passwords:
AWARD_SW, Award SW, HLT, Condo, CONCAT, TTPTHA, aPAf, HLT, KDD, ZBAAACA, ZAAADA, ZJAAADC, djonet, ALFAROME, ALLy, _award, AWARD_SW, AWARD?SW, AWARD SW, AWARD PW, AWKWARD, awkward, 01322222, J64, j256, j262, j332, j322, 01322222, 589589, 589721, 595595, 598598
  1. AMI BIOS backdoor passwords:
AMI, AAAMMMIII, BIOS, PASSWORD, HEWITT, RAND, AMI?SW, AMI_SW, LKWPETER, A.M.I. CONDO
  1. PHOENIX BIOS backdoor passwords:
phoenix, PHOENIX, CMOS, BIOS, ALFAROME, BIOSTAR, biostar, biosstar, CMOS, cmos, LKWPETER
  1. BIOS PASSWORDS BY MANUFACTURER:
  • VOBIS & IBM – merlin
  • Dell – Dell
  • Biostar – Biostar
  • Compaq – Compaq
  • IBM – APTIVA BIOS

Resting by password cracking software –

We can also reset the bios password by the cracking software’s like “Hirens.BootCD.15.2.zip”. We also use Hirens Boot CD because it’s bootable software which contains numbers of diagnostic tools and a live operating system.
Step 1 – Boot the “Hirens.BootCD”
Open the boot menu by pressing F9, F10, F11, F12 whatever your motherboard support’s and Select the DVD-RW to Boot Up the CD.
boot menu dvd1 How to clear or reset your laptop BIOS or CMOS password ?
Step 2 – Select the Dos Programs.
After booting the cd you will see the Hirens boot cd menu. Select the Dos Program.
hieren boot menu1 How to clear or reset your laptop BIOS or CMOS password ?
Step 3 – Select the “Next…” on the 9th No.
hieren boot menu 21 How to clear or reset your laptop BIOS or CMOS password ?
Select Next and find the “BIOS/CMOS tools” and open it.
Step 4 – Select the Bios Cracker 5.0 tool in the BIOS/CMOS tools.
hieren cmos tool1 How to clear or reset your laptop BIOS or CMOS password ?
After selecting the “Bios Cracker 5.0 (cmospwd)” your screen got fluctuate and you see some software gets auto start and ask you some of questions like language or something, you’ll just have to click enter and that’s it. After some of questions you will see, the program asks you to “Press enter key to continue”. Just press the enter key and your bios password got reset. Restart your computer and check the password is removes or not. If the password is still remains try ours another solution listed below.
cmos cracker tool 5.01 How to clear or reset your laptop BIOS or CMOS password ?

Resting by bios jumper and solder bread –

You can also reset the bios by CMOS jumper. Shorting the jumper till 20 sec can reset your bios password. Mostly the bios jumper Is located nearest by the ram slot or the CMOS battery. The CMOS jumper is looks like this:
motherboard-jumper
Step 1 – Open Your computer case.
Step 2 – Find the jumper.
Step 3 – Move the metal cover from 1-2 to 2-3 for 10 sec and after that move back the metal cover to 1-2 again.
clear cmos passwork by jumper
Step 4 – Assemble back your computer case and test it.
After shorting the password has been cleared. If it has, screw back the cover and load the default setting in the bios to make bios on its original position. If the password is still remains try ours another solution listed below.

Resting by C-MOS battery – 

All the cmos and bios setting is saved in the bios chip which was attached on the motherboard. The main work of cmos battery is giving a continuous power supply to the bios chip to save all the settings. If you unplug or remove the battery for above 5 sec, the bios setting will be reset.
Step 1 – Unplug all the power supply which is connected to your computer. Means power cable.
Step 2 – Open your computer case.
Step 3 – Disconnect the CMOS battery.
After finding the battery, just disconnect it or remove the battery for 5 sec.
remove-bios-battery
Step 4 – Short the CMOS battery connector by the use of metal wire because in some of motherboard manufacturers backup the power to the Bios Chipset by using of some capacitor that’s why we short them to remove the remains power supply.
CMOS Connector shorting1 How to clear or reset your laptop BIOS or CMOS password ?
Step 5 – Reinstall the CMOS battery and assemble back your computer case and that’s it. Power up your computer and the bios got reset.

 Note – Sometimes these solutions doesn’t work. In that case you’ll have to re-install your bios software or replacing the bios chip.

Enjoy..........NCTTS

How To Fix Windows Explorer Has Stopped Working

How To Fix Windows Explorer Has Stopped Working ?

windows-explorer-has-stopped-working
Questions:
  1. My computer starts showing Windows Explorer Has Stopped Working on every windows login ?
  2. Explorer or expoler.exe appcrash while working or on startup of computer?
  3. Need to start explore.exe by run command in task manager manually every time when Windows Explorer Has Stopped Working arrives on the computer screen?
These are those questions what I’m getting once in a week so i think to create a tutorial about this topic to help and understand you people better about this problem.
Actually Explorer.exe is program which your windows operating system starts automatically on every windows startup to use your computer in a normal way. If your windows explorer might bit in problem that means its 100% possible you’ve seeing this “Windows Explorer Has Stopped Working” app crash while working on your computer or maybe on system’s startup. Explorer is just a program like others and it’s also possible it gets corrupted and that’s normal because when a virus hits your computer the first thing it will do to corrupts your windows explorer file to make your computer abnormal. Sometimes it’s easy to fix this problem but sometimes it won’t so, let’s see how quickly you fix your problem by following our solution guide below.

Solution Guide

Note: Try to run your computer on safe mode if your computer is not able to opens up normally.
Note: Try to run your explorer by run command feature on task manager if your windows explore still won’t able to opens on safe mode either. To open task manager on blank screen you’ll need to press“Ctrl+Aly+Del” key at the same time and the menu screen will opens up in front of you and after that click on file at the first right top option on task manager.
File >> New Task (Run…) >> Type “explorer.exe” and hit enter.
exploere run by task manager

Virus Scan & Registry Cleaning

Now you know this “Windows Explorer Has Stopped Working” problem is normally created by viruses and the best solution is to try is, install a good antivirus and do full system viruses scan and after that run windows registry cleaner software to repair and clean your windows registry from viruses. I’m only suggest these recommendation because viruses makes your windows registry infected and change it with the fake values in order to make your computer unable to use.
  1. Download and install a good antivirus and after that fully scan your computer. >>DOWNLOAD – Avast! Free Antivirus<<
  2. Download and install a good windows registry cleaner and after that scan and fix your computer’s registry.  >>DOWNLOAD_CCleaner_Free_Registry_Cleaner_tool<

Drivers Update

Normally this problem comes with corrupted video drivers of your computer and reinstalling drivers is the only option you have if the problem is generating from a corrupted drivers.

Repair Your Windows

If the above solution wont works for you that mean your computers windows got corrupted and it needs to get repair. To repair your windows there are 3 things you can do to fix your computer and those are:
1. “Sfc /Scannow” Cmd Command – “Sfc /Scannow” is a system scan command to repair and fix your windows by command prompt automatically. It’s a best way to fix your windows by just typing single command on your computer and most of this problem got quickly fix by just using it. To use this command you’ll need to open your window command prompt ‘as an administrator’ and then type the “Sfc /Scannow” command on it like the picture shown below.
sfc scannow
2. Manually Registry Repair – Most of times these above given solutions wont works because of windows bad corruption then the second option you have is to repair your windows registry by your own. Repairing registry for your explore is very easy you’ll just have to follow the instruction given below.
   A. Press Windows key + R to open run command and after that type “Regedit” and hit enter to get into windows registry folder.
regedit open by run command
   B. Now go to the given path on your windows registry editor by on folding registry folders  “HKEY_CURRENT_USER\Software\Microsoft\Windows NT\CurrentVersion\Windows” and after that you will find your registry look like this:
virus corrupted load registry fo explorer
As you can see on listed picture above there are 2 types of possible “load” file you’ll find on your computer screen, one with virus corrupted and second one is normal which don’t have any data value on it.  On my computer my “load” string file having a value data path to “xfvcww.exe” because of virus corruption and that means my windows is having problem with explorer. If your load file looks normal to you that means you have this load registry file problem just move to our next registry repair step No. “D:” below.
   C. If you find your load file is corrupted then the best thing you can do to modify your registry and makes it normal as it was before. Just right click on your “Load” registry and after click on modify. After when the “edit string” windows pop out just edit the valve and make it blank and click ‘ok’ to save your file. After saving the file make a reboot (restart) your computer and test it. If the problem still exists move to our next step below.
save load value
   D. If the above registry repair wont works for you or maybe you didn’t find any corrupted load file then it’s possible you having a problem with another registry file. To identify you’ll need to go to this path and search for a registry named “shell”. Path “HKEY_CURRENT_USER\Software\Microsoft\Windows NT\CurrentVersion\Winlogon
If you find a registry named “shell” with some virus file path attached to it than its 100% possible this is a main root of your problem. In that case you can delete or edit the shell registry to blank and then restart your computer to make it normal as it was before. If you can’t find any file named shell that means your windows is fully corrupted and you can fix it by resorting or reinstallation of your computer windows.
shell registry fix for explorer

Last Options

If you still having this Windows Explorer Has Stopped Working appcrash on your computer after trying all the solution given above in this tutorial then you have only two options left and those are”
  1. Restore your windows to the earlier stage and make it back to normal.
  2. Reinstall your windows and make everything back to new.
Enjoy...........NCTTS

Replace or change a broken laptop display screen

How to replace or change a broken laptop display screen ?

Whether you have a broken, cracked, dead or burned pixel display screen you will think about to change it or rather be by yourself and that’s why i make this tutorial to show you how you can easily change your broken or dead display screen by yourself with just using a screw driver.
If your laptop’s display doesn’t show you anything that doesn’t mean your display got dead you’ll have to make sure about your screen by connecting it to another external monitor.

So let’s see

Either you have a LCD or LED display in your laptop, the procedure is same for every type or screen. So watch and read this tutorial carefully and repeat the steps which we shows you.
Step 1- Switch OFF Power
The first thing is to do is turn off your laptop, remove the power adaptor cable and battery also.
1 laptop power and battery remove
Step 2 – Removing Rubber Protector
Remove the rubber cover by the help of your nails which was pasted on screws.
2 remove rubber cover bezzel
Step 3 – Remove the Screws
Remove the screws by using screwdriver. If you don’t find any of screws on the display cover then  you can skip this step and move on to next.
3 remove display screws
Step 4 – Open the Casing
Open the display case by the use of your finger nails and a flat screwdriver.
4 remove the cover display
And after that unmatched the base cover.
5 laptop display dissassembley
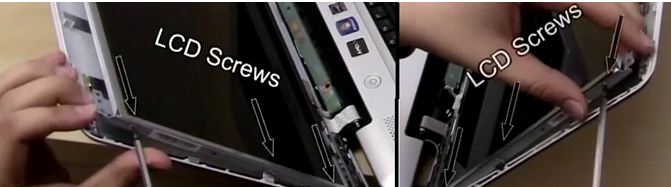
Step 5 – Remove the Frame Screws.
6 remove frame screws
Step 6 – Remove The Hinge Screws From The Left And Right Side, Both.
7 remove hinge screws
Step 7 – Remove the Video Connecter
Laydown the screen on the keyboard and remove the video connecter
 8 video connector
Step 8 – Remove the CCFL Power Connector
Disconnect the CCFL power connector from the bottom of your LCD screen. If you having a LED screen then you’ll never able to find that power connect because the led doesn’t need it and it’s also not possible to install LED in the place of LCD.
9 remove ccfl power connctor
Step 9 – Install the New LCD/LED
Now install the new LCD or LED and reconnect the video cable and CCFL power connector.
10 Install the New LCD LED
Step 10 – Install the Screws Back to the Hinge and the Frame
11 remove hinge screws
12  install the frame
Step 11 – Reattach the Display Case and Install Back the Screws
13
Step 12 – Testing
Now you’ve done with the installation of your display screen. Plug back the battery and turn on your laptop.
14
Enjoy........NCTTS