How to replace or change a broken laptop display screen ?
Whether you have a broken, cracked, dead or burned pixel display screen you will think about to change it or rather be by yourself and that’s why i make this tutorial to show you how you can easily change your broken or dead display screen by yourself with just using a screw driver.
If your laptop’s display doesn’t show you anything that doesn’t mean your display got dead you’ll have to make sure about your screen by connecting it to another external monitor.
So let’s see
Either you have a LCD or LED display in your laptop, the procedure is same for every type or screen. So watch and read this tutorial carefully and repeat the steps which we shows you.
Step 1- Switch OFF Power
The first thing is to do is turn off your laptop, remove the power adaptor cable and battery also.

Step 2 – Removing Rubber Protector
Remove the rubber cover by the help of your nails which was pasted on screws.

Step 3 – Remove the Screws
Remove the screws by using screwdriver. If you don’t find any of screws on the display cover then you can skip this step and move on to next.

Step 4 – Open the Casing
Open the display case by the use of your finger nails and a flat screwdriver.

And after that unmatched the base cover.

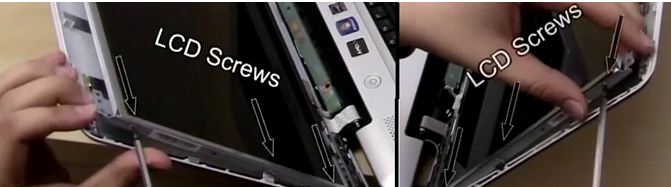
Step 5 – Remove the Frame Screws.

Step 6 – Remove The Hinge Screws From The Left And Right Side, Both.
Step 7 – Remove the Video Connecter
Laydown the screen on the keyboard and remove the video connecter

Step 8 – Remove the CCFL Power Connector
Disconnect the CCFL power connector from the bottom of your LCD screen. If you having a LED screen then you’ll never able to find that power connect because the led doesn’t need it and it’s also not possible to install LED in the place of LCD.

Step 9 – Install the New LCD/LED
Now install the new LCD or LED and reconnect the video cable and CCFL power connector.

Step 10 – Install the Screws Back to the Hinge and the Frame


Step 11 – Reattach the Display Case and Install Back the Screws

Step 12 – Testing
Now you’ve done with the installation of your display screen. Plug back the battery and turn on your laptop.

Enjoy........NCTTS
No comments:
Post a Comment