How to Quick Boot A USB or CD/DVD Directly From the Boot Menu ?

How to Quick  Boot A USB or CD/DVD Directly From the Boot Menu ?

I know this time you might wanna to boot something on your computer and the quickies way to boot something is by boot menu. Boot menu is the quick selection screen which can give you the one time selection for the item what you want to boot either it’s USB to boot or a CD-ROM. By the boot menu booting made easy to you, by using this you don’t need to make changes in your computer bios setting to make boot something. If you want to install windows from your Pendrive or DVD, or want to boot some software to use, the boot menu will make it easier and in this tutorial I’m gonna show you how to do it.
Using boot menu is very easy anyone can do this you’ll just need an assign keyboard key to press which will open the boot menu when the computer starts. Normally the first boot screen give you the instruction like a key name to open it or either you can try some default keys to open it. If the boot screen didn’t show you something then you can try these key one by one to open the boot menu. The keys areEsc, F7, F8, F9, F10, F11 and F12 you can try these keys one at a time by pressing it again and again after the 2 sec of your system starts and if the key is correct your boot menu will open. Try the F10, 11, 12 first because it will assign most for the menu. Sometimes the Esc key take you to the menu where use can select the item what you wanna to open like bios, boot menu, memory test etc. I means you can try that one too if your computer have that one.
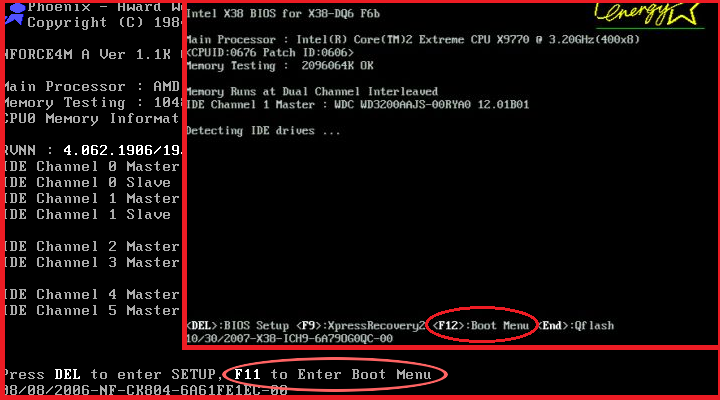
bios-boot-menu-message
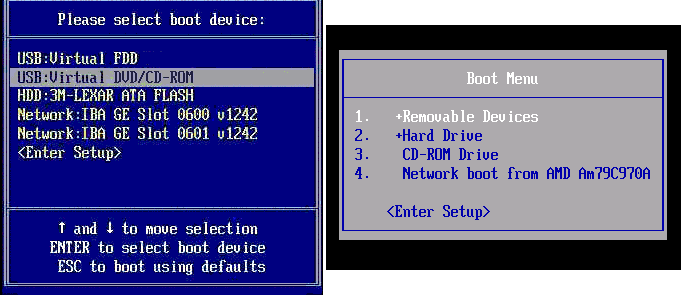
By using the above keys now I think you are in the boot menu. In this menu now you are seeing all of your Hard Drive, Cd or DVD Drives and Your Pendrive or whatever the storage device you’ve connected to it. Now you can easily select the drive what you want to boot from and make it work.
If you are wanted to boot from your pen drive or your flash drive, you can do it by just selecting the drive into it or if want to boot from your DVD drive then you’ll also need to do the same too. Just select the item by your keyboard’s aero key and hit enter that’s it.
vmi_boot_menu
If your computer doesn’t supports the boot menus then you can also configure the boot sequence by yourself in the bios setting.

How to Enable Hibernate In Windows 8

How to Enable Hibernate In Windows 8

Today we are here with the method for How to Enable Hibernate In Windows 8. Many of the computer user are using windows 8 in their laptops and desktops today. But there was a feature in Window 7 that user did not get in their window 8, the feature is Hibernate option. This feature is actually available in window 8 too, but it is actually disabled by default. So if you want to use hibernate in window 8 then you have to enable this feature. So we are here to resolve your this issue with a method by you canactivate the Hibernate in Window 8. So just follow up the below post to proceed.

How to Enable Hibernate In Windows 8

How to Enable Hibernate In Windows 8
In this method you will activate the hibernate option that is by default disabled by the microsoft. In this method you will access power options that are capable of editing window power settings and then you will be able to enable or disable your selected button in shutdown options. So just follow the below steps to proceed.

Steps To Enable Hibernate In Windows 8

  1. First of all you need to open power settings of your computer, for that press Win+w(window button+ w letter)button of your computer keyboard.
  2. Now a search box will get appear at the right of screen, type there “power” and select “Power options” there.
  3. Now the power option explorer will open, there at left side select “Choose what the power button do”.
  4. Now click on the “Change settings that are currently unavailable”.
  5. Now scroll down and under the shutdown option click on the hibernate check box there at the bottom.
  6. Now click on save changes and close the explorer.
  7. Thats it you are done, now everytime you click on power button you will get the hibernate option too.
Enjoy The Tricks........NCTTS

How To Record Screen On Android Without Root (No Root)

Today we are here with the method for How To Record Screen On Android Without Root. Today there are more than billions of people that are using android these days. This operating system belongs too google which provides lots of features for its users than any other OS. So here we will be talking one of the best feature of android that you might not know. that is the method for recording the screen in your android, yes it is possible. It is very cool to record the activities performing on your android. Now you can do this by just following the post below.

How To Record Screen On Android Without Root (No Root)

How to Record Screen On Android No Root
By recording screen you can track all the activities of your android when you give your android to someone else like your younger brother, sisters or your friends.The method is very simple and straightforward as you need some of the screen recording apps for your android.

Android Screen Recording Apps To Record your Screen Activity

#1 AZ Screen Recorder

This is one of the best android app to record screen in android as in this app there is facility ofanonymous recording by which you can easily record screen and the clips of your front camera without anything displaying on screen. And this app is specially designed for the lollipop version of android.

#2 Rec.

This is an another android app which records the screen activity. This app is freely available and works without root. In this app you have to set the bit rate and file saving path at the very first use. You can even record audio with this app and this app gives you 10 second when you click on ready to make you ready for the recording.

#3 One Shot Screen Recorder

This is actually a paid app that records the screen with the full convenient way for the user. The free trial version of this app is also available but there you will see the watermark at all the videos and there will be ads in the app which is not in the paid version for better user experience.

#4 Shou

This is very popular app that help you to record the android screen easily. Bu this app you canrecord screen with stereo sound, mirror your device screen to any Miracast or AirPlay enabled devices, and you can even take a screen shot simply by shaking your Android device in this app.

#5 Mobizen

This is one of my favorite app to record android screen activities without rooting it. In this app you can record scree, share data b/w computer ann your android and lots of more option that are available in this app. Also this app is freely available in the Google Play Store.
Enjoy the tricks.............NCTTS